5 EMA Scalping Strategy by Power of Stocks
These strategies are for demonstration purposes only and are not intended for actual trading. AlgoTest is not responsible for any profit or loss arising from the use of these sample strategies.
FREE 5 EMA Pinescript
To learn how to add this pinescript in TradingView, click here.
// This Pine Script™ code is subject to the terms of the Mozilla Public License 2.0 at https://mozilla.org/MPL/2.0/
// © AlgoTest
//@version=5

indicator(title='5Ema Indicator', overlay=true)
RiRe = input.int(defval=3,title='Risk to Reward Ratio',minval=2,maxval=25)
ema_length = input.int(5, title='EMA Length')
ema = ta.ema(close,ema_length)
plot(ema, 'EMA', color=color.blue, linewidth=2)
var bool Short  = na
var int shortC = 0
var int sslhitC = 0
var int starhitC = 0
var float ssl = na
var float starl = na
var float star = na
var float sellat = na
var float alert_shorthigh = na
var float alert_shortlow = na
if dayofweek != dayofweek[1]
    Short := na
    shortC := 0
    sslhitC := 0
    starhitC := 0
    ssl := na
    starl := na
    star := na
    sellat := na
    alert_shorthigh := na
    alert_shortlow := na
Short := low[1] > ema[1] and low[1] > low and shortC == 0
sslhit = high > ssl and shortC > 0 and sslhitC == 0
starhit = low < star and shortC > 0 and starhitC == 0
if Short
    shortC := shortC + 1
    sslhitC := 0
    starhitC := 0
    alert_shorthigh := high[1]
    ssl := high[1]
    starl := (high[1] - low[1]) * RiRe
    star := low[1] - starl
    sellat := low[1]

if sslhit == false and starhit == false and shortC > 0
    sslhitC := 0
    starhitC := 0
else
    if sslhit
        shortC := 0
        sslhitC := sslhitC + 1
    else
        if low < star and shortC > 0 and starhitC == 0
            shortC := 0
            starhitC := starhitC + 1
plotshape(Short, title='Sell', location=location.abovebar, color=color.teal, style=shape.arrowdown, text='Sell', textcolor=color.teal)
plotshape(sslhit, title='SL Hit', location=location.abovebar, color=color.red, style=shape.arrowdown, text='SL Hit', textcolor=color.red)
plotshape(starhit, title='Target Hit', location=location.belowbar, color=color.green, style=shape.arrowup, text='Target Hit', textcolor=color.green)
alertcondition(Short, "Short Signal", "Short Signal")
alertcondition(sslhit, "Stop-loss hit", "Stop-loss hit")
alertcondition(starhit, "Target hit", "Target hit")
This document outlines the automation of the '5 EMA scalping strategy', a technical analysis approach designed to capture short-term profits in fast-moving markets. The strategy utilises the 5-period exponential moving average (EMA) to identify potential entry and exit points for trades.
This document is intended for traders familiar with technical analysis concepts and scalping strategies. It provides a comprehensive overview of the core principles, entry and exit signals, and risk management techniques associated with the 5 EMA scalping strategy. Additionally, it explores methods for customising the strategy to individual trading styles and risk tolerance levels.
This guide, inspired by a YouTube video of a famous youtuber Subhashish Pani having youtube channel name Power of Stocks, unpacks the core principles, entry and exit signals, and risk management techniques associated with the 5 EMA scalping strategy. Remember, while this strategy offers a valuable framework, it's not a magic formula. We'll explore ways to customise it to fit your trading style and risk tolerance.
What is the 5 EMA Scalping Strategy?
At its heart, the 5 EMA scalping strategy leverages a technical indicator called the Exponential Moving Average (EMA) to identify potential short-selling opportunities. The EMA smooths out price fluctuations, revealing the underlying trend. In this strategy, we focus on the 5-period EMA, making it highly responsive to recent price movements.
The Power of the 5 EMA
Imagine the 5 EMA as a dynamic line on your trading chart. When the price is above the 5 EMA, it often suggests that the price has moved away from its mean point and is likely to come back to the mean at some point in time.
The 5 EMA scalping strategy is a reversal strategy based on the logic that the price has to return to its mean. Here, 5 EMA is considered as the mean point of the price. Thus, in the 5 EMA strategy, we look for reversals when the price moves away from its mean, i.e., 5 EMA. This strategy capitalises on situations where the price seems to be losing momentum in an uptrend. We will look for specific price action signals near the 5 EMA to initiate short trades, aiming to profit if the price continues its downward journey.
Spotting Your Entry: The Qualifying Candle
Our strategy hinges on a specific type of price action -- the qualifying candle. This isn't a fancy candlestick pattern; it's simply a candle that meets two key criteria:
-
Price Position: The candle must be closes above the 5 EMA. This reinforces the initial uptrend assumption.
-
Non-Touching High/Low: The qualifying candle's low shouldn't touch the 5 EMA. This indicates that price is above its mean point.
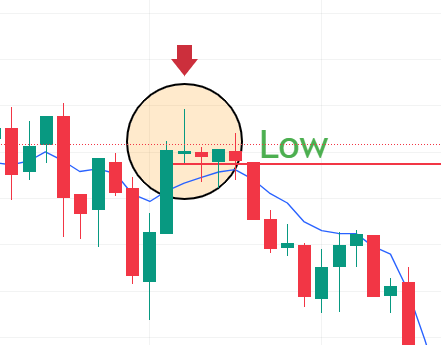
In the image above, you can see that the highlighted candle closed above the blue line and the candle's low is also above the blue line (EMA of length 5), making it a qualifying candle.
Ready, Set, Short!
Once you identify a qualifying candle, it's time to sharpen your focus. Here's the trigger for your short entry:
- Breaking the Low: If the price dips below the low of the qualifying candle, it suggests a potential breakdown in the uptrend. This is your entry signal.
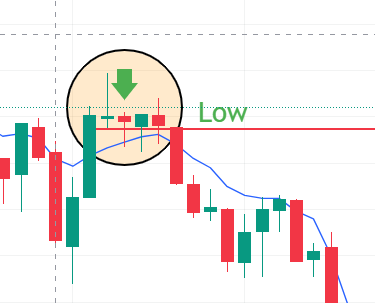
In the above image you will be able to view the green arrow marked candle as our entry candle which took entry when the low of the qualifying candle is crossed.
Why Short Here?
The breakdown below the qualifying candle's low implies that the uptrend might be losing steam. By entering a short trade here, you're essentially betting that the price will continue its downward trajectory.
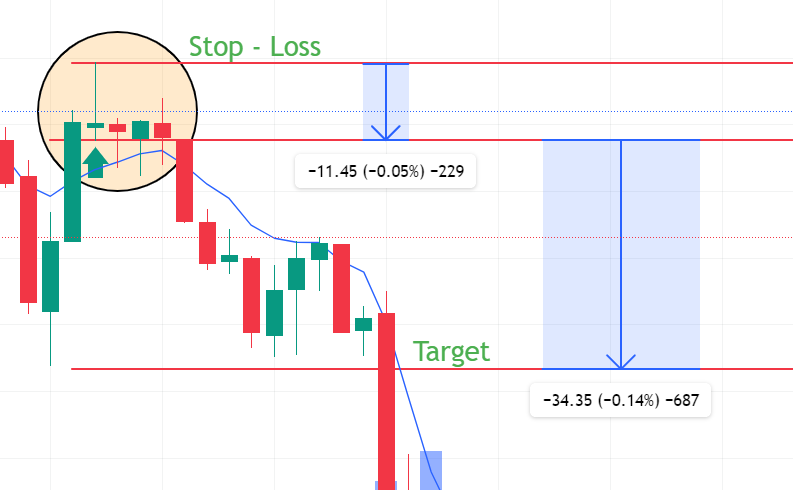
Exiting Gracefully: Stop-Loss and Take Profit
No trading strategy is complete without a solid risk management plan. Here's how the 5 EMA scalping strategy incorporates stop-loss and take-profit orders:
- Stop-Loss: To limit potential losses, place a stop-loss order above the high of the qualifying candle. This ensures you exit the trade if the price unexpectedly surges higher, invalidating your short thesis.
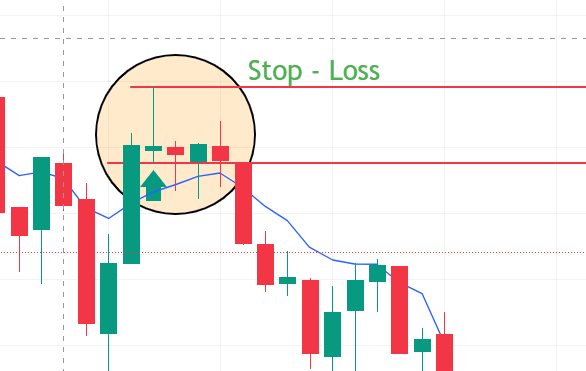
- Take-Profit: Aim for a minimum 1:3 risk-to-reward ratio. This means your take-profit target should ideally be three times the distance between your entry price and your stop-loss level. This helps ensure you capture a decent profit when your short trade goes your way.
Automating 5 EMA Strategy on AlgoTest
TradingView includes a feature called Alerts. Suppose you want to execute an ATM Put buy trade when the 5 EMA strategy gives a sell alert.
By using the alert feature, you can set it up so that if the strategy gives a sell signal, you will receive an alert via SMS, email, or notification on your mobile device. Once the strategy condition is met, you will be alerted, and you can then execute the trade on your broker's platform.
If you prefer not to manually execute the trade on the broker's end, you can utilize AlgoTest's Signals to automate this indicator-based strategy. AlgoTest Signals will capture the alert and execute the trade automatically on your broker's platform based on your instructions.
You just need to create an alert on TradingView and link it with AlgoTest, and that's it. Your indicator-based algorithm is now set to automatically execute your trades for you.
Requirements
TradingView Essential Plan
You should have a minimum TradingView Essential Plan activated on your TradingView account to use AlgoTest Signal.
AlgoTest Signal Bridge Plan
You should have a Signal Bridge Plan activated on your AlgoTest account.
Broker Connect with AlgoTest
You need to connect your broker with AlgoTest to use AlgoTest Signal. To connect your broker with AlgoTest click here.
Pine Script Code
You will need a Pine Script Code that can generate buy or sell signals as per your conditions in AlgoTest. You can get this code here.
Connecting 5 EMA with AlgoTest
To automate the strategy for 5 EMA on AlgoTest, you first need to create alerts in TradingView. Then, these alerts can be used to connect with AlgoTest via a webhook. You will create alerts in TradingView, which will generate entry and exit alerts based on our strategy conditions. Then, in AlgoTest, you will create a "Put Buy" strategy and connect both of them via webhook. When your 5 EMA strategy gives a sell signal in TradingView, AlgoTest will capture the alert and execute the ATM Put Buy position on the broker's end. Similarly, when your strategy gives an exit alert in TradingView, AlgoTest will capture the alert and exit your entry position.
Adding 5 EMA indicator in TradingView
First, we need to add Pine Script code in TradingView that will generate a buy or sell signal according to the 5 EMA strategy. Click here to learn how you can paste the 5 EMA code in TradingView.
Creating Alerts in TradingView
Alerts in TradingView notify you when entry or exit conditions are met. We'll set up alerts for our entry and exit conditions.
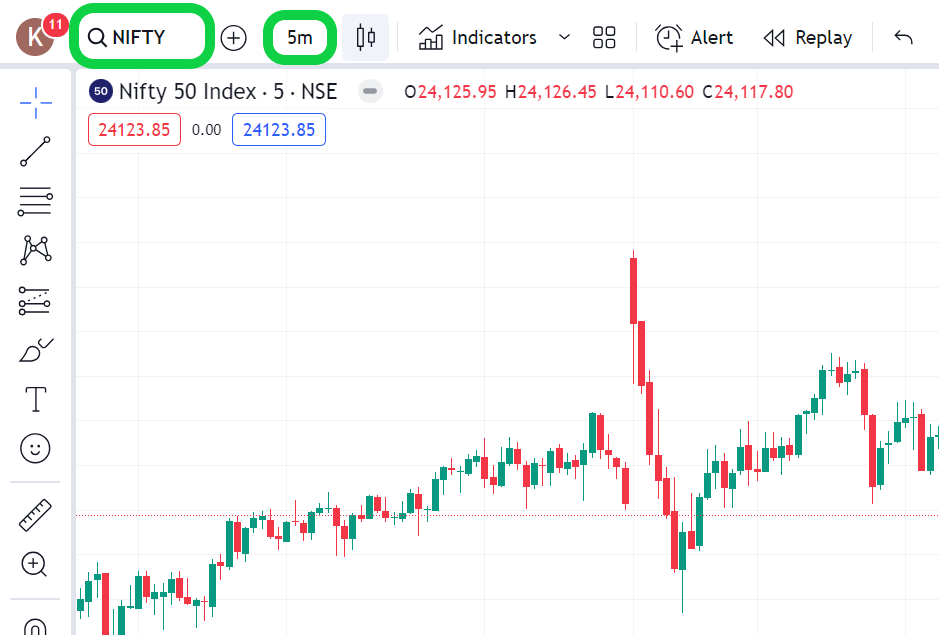
- Assume we want to automate 5 EMA strategies on the Nifty 5 minute chart. So we will open the Nifty 5 Minute chart in TradingView as shown in the image below.
-
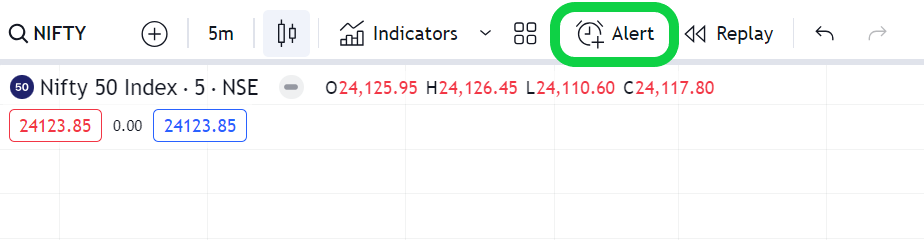
To create an alert, click on the "Add Alert" button as shown in the image below.
-
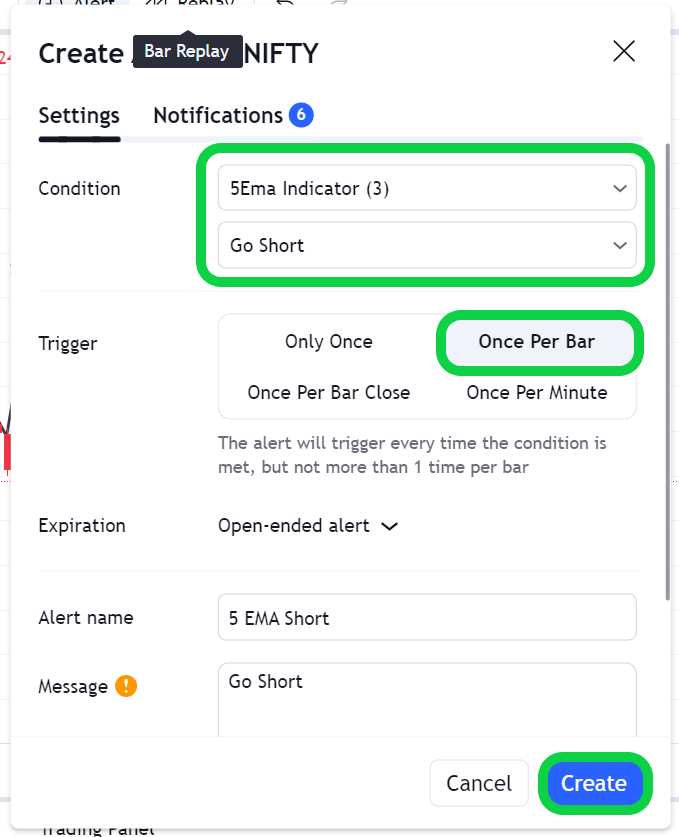
We need to create an alert for three conditions : Short Entry, Short Stop Loss, and Short Target. We'll start by setting up an alert for the Short Entry condition, as illustrated in the image below.
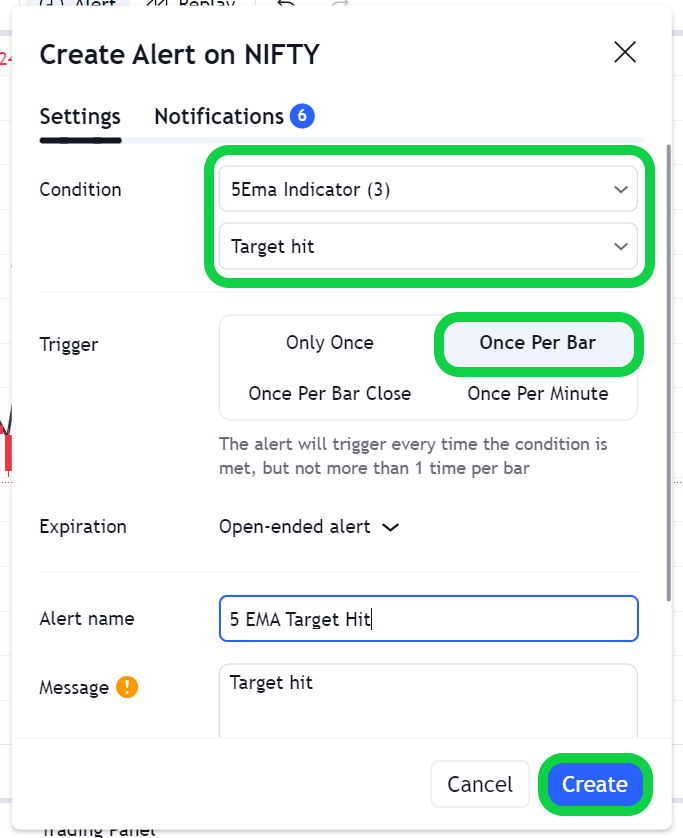
- Similarly we will create another two alerts i.e. Short Stoploss & Short Target as shown in the image below.

- Now you will be able to view these alerts in the alert section as shown in the image below.
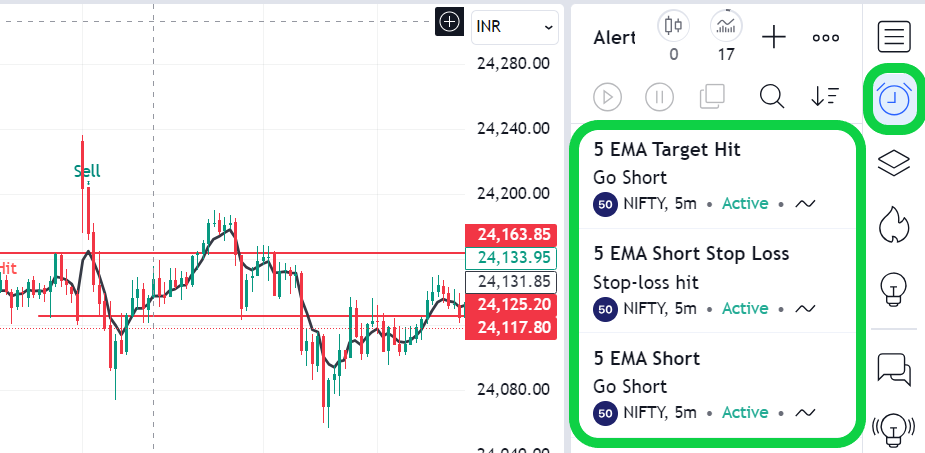
As we have created our 3 alerts. Now we need to connect these alerts with AlgoTest for automation. So when the 5 EMA Short condition is met, an alert will be generated in TradingView and it will be executed automatically on broker end by AlgoTest. Similarly when the Stop Loss or Target Alert is generated it should automatically exit our entry position on the broker's end.
Connecting Alerts with AlgoTest
We can connect TradingView Alerts with AlgoTest via webhooks. Follow some simple steps as shown below.
-
Launch a new browser tab. In this new tab, navigate to the AlgoTest website and log in.
-
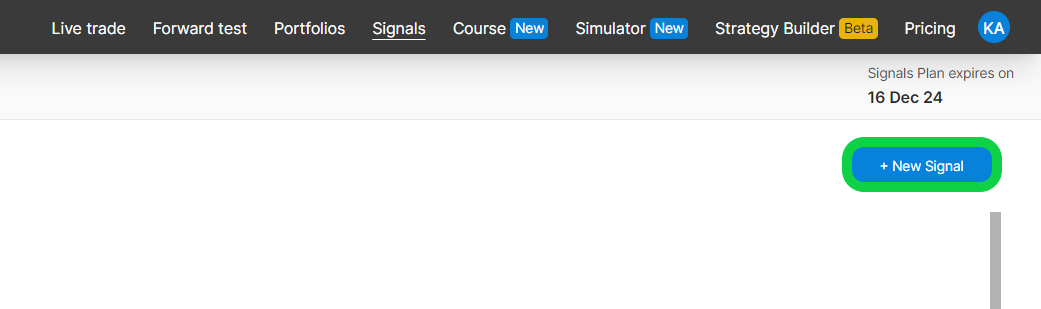
Once logged in, find and choose the 'Signals' feature of AlgoTest, as seen in the figure below.

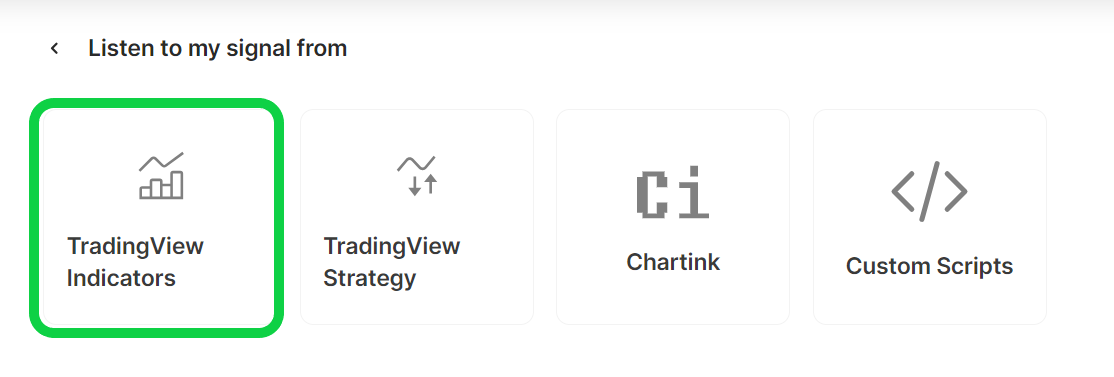
Choose 'New Signal' and the 'TradingView Indicator' option.
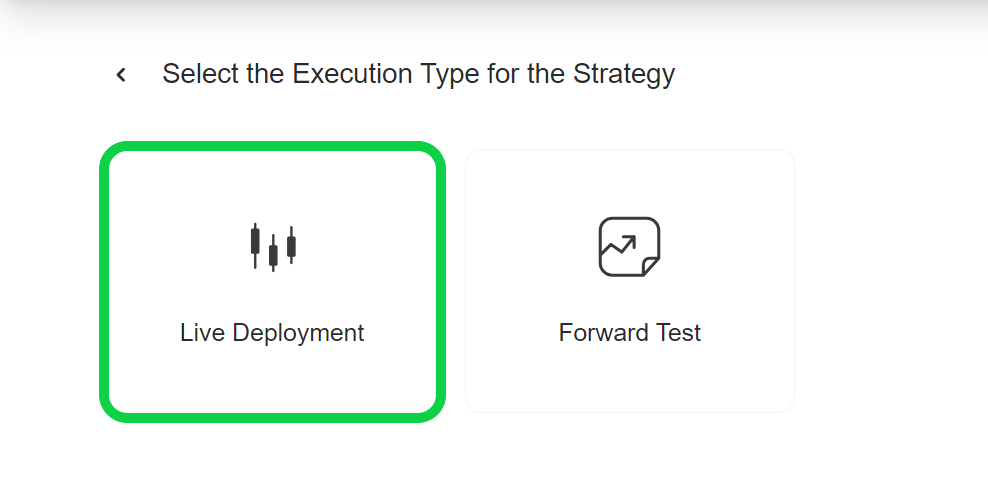
- There are now two options available to you:
-
'Live Deployment'
-
'Forward Test'
Now, we will briefly explain the above options.
Firstly, let me explain the word 'Deployment'. 'Deploying a stratеgy' mеans to apply thе stratеgy in thе actual stock markеt.
What does Live Dеploymеnt mеan?
This option allows you to deploy your trading strategy in the live market. Whеn you choosе this option, AlgoTеst monitors thе strategy entry and exit conditions in real-time and as soon as an alert comes from TradingView it will execute the order in your broker terminal.
What does the Forward Test mean?
Forward tеsting or paper trading means trading with virtual money using LIVE markеt data. You can see your trades and PnL in AlgoTest but you will not need any broker for forward testing.
If you want to use this strategy in a live trading environment, select 'Live Deployment.' If you'd rather paper trade at first, select 'Forward Test.' Please keep in mind that the methods for linking live and forward trading are the same.
- Click 'Create Strategy'. Now we have to create a strategy in which we will add a Nifty ATM Put Buy Leg.

- Configure the leg in leg builder as shown in the image below and click on add leg.
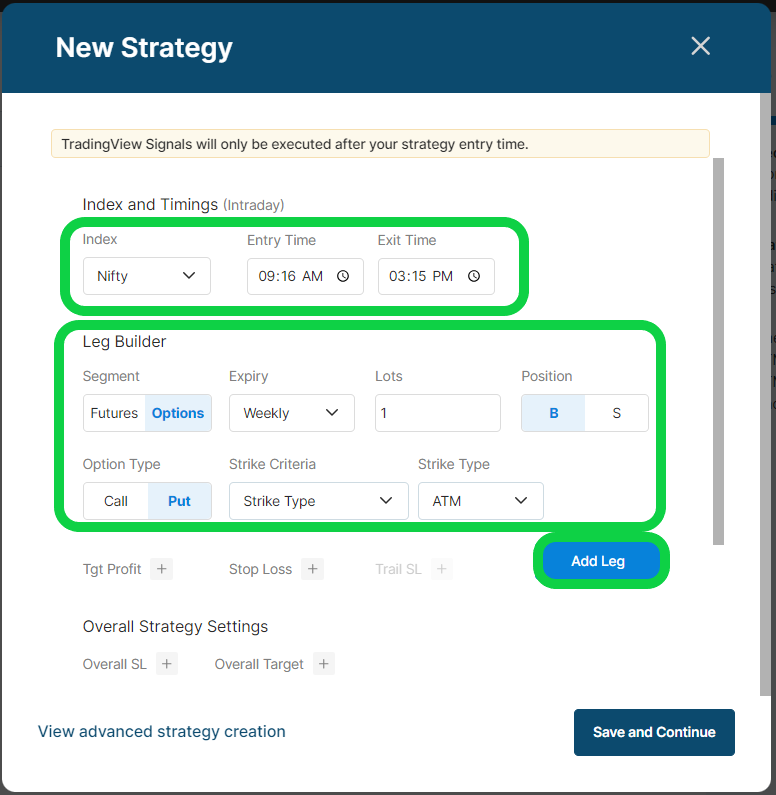
Important Strategy Specifications:
-
Nifty Index
-
Time of Entry: 9:16 (This implies that our strategy will start responding to alerts from TradingView only after the chosen entry time, in this example, 9:16. Please remember that this timing does not correspond to the execution at 9:16.)
-
Time of Exit: 3:15 (Our strategy will no longer respond to the TradingView alerts after 3:15. Any alert generated after this time will not be considered. Until 3:00, the strategy will only respond to TradingView alerts.)
Due to the presence of an exit condition, we have not included a stop-loss in the strategy. You, on the other hand, have the option to include one if you wish.
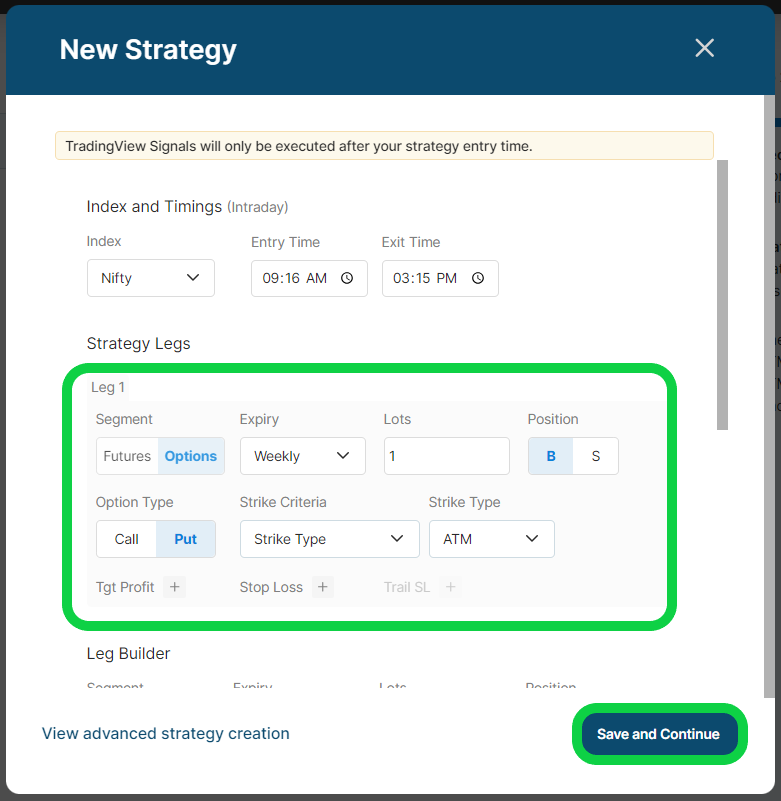
- Now you can see Leg1 is added under Strategy Legs as shown in the image below. Click on save and continue.
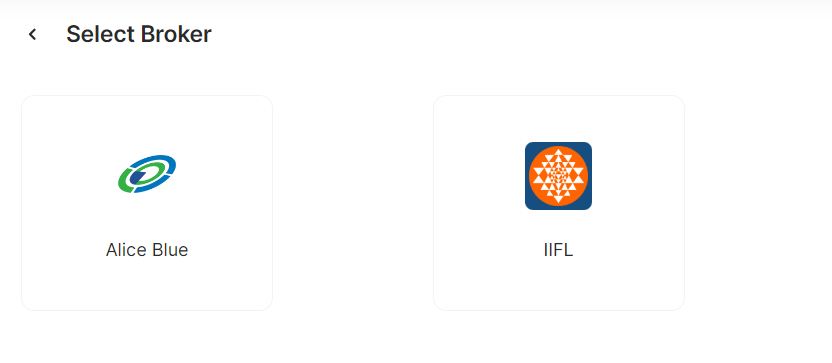
- Now, name the strategy. You will be asked to select your broker from the options shown in the image. Choose your preferred broker.
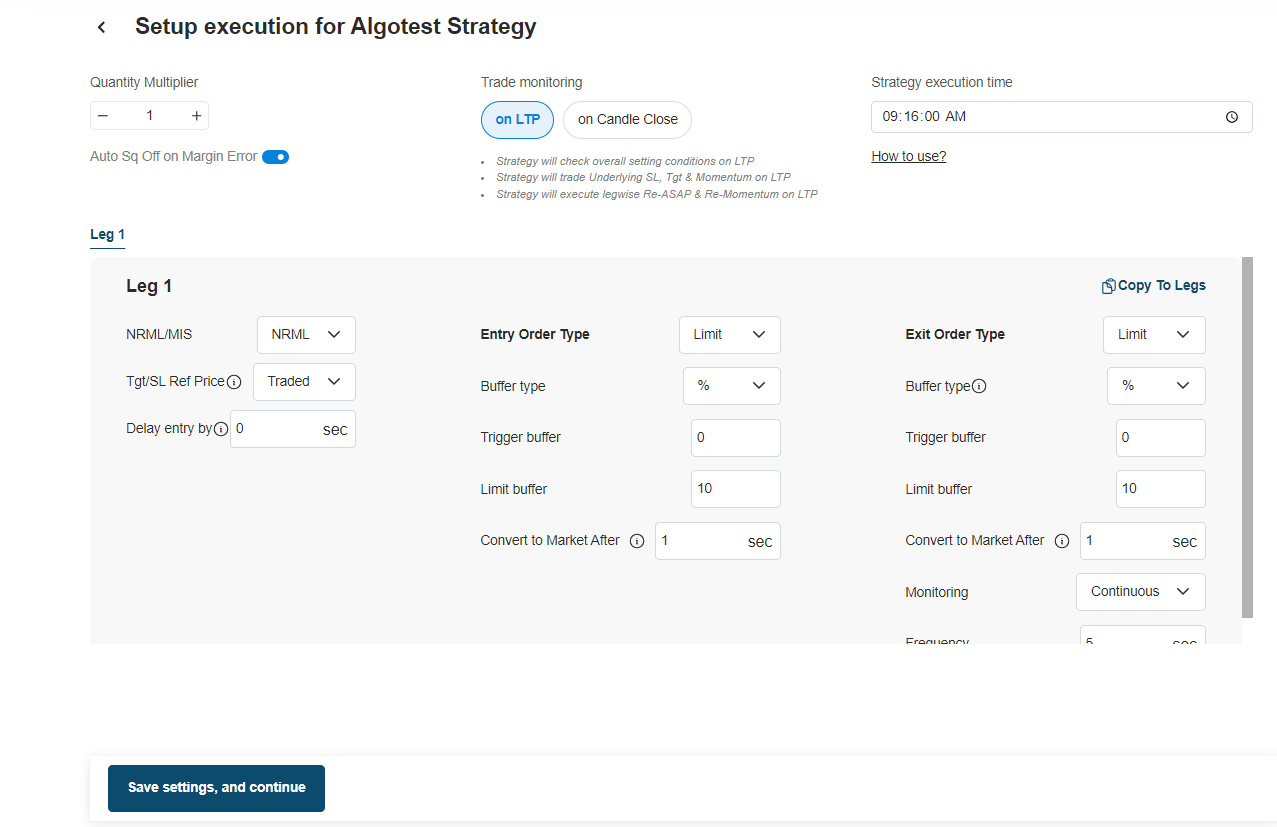
- It will ask for execution parameters, We'll give you recommendations for the best execution. If you don't want to get into the specifics, just use the settings shown in the image below. You can read about execution settings here.
After you've finished customising these options, click 'Save Settings, and Continue.'
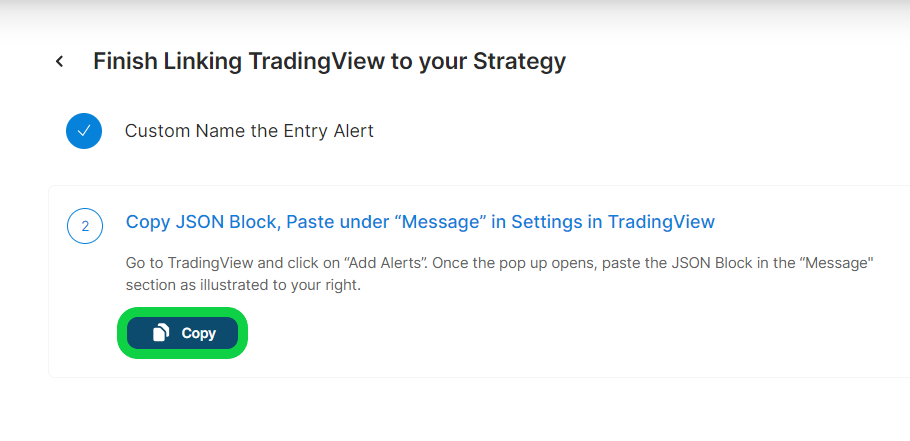
- You can name the entry alert '5 EMA Strategy Entry' (or any other name you like). Now, as seen in the figure below, copy the JSON Block code using the copy icon. We need to put this JSON Block in the TradingView entry alert.
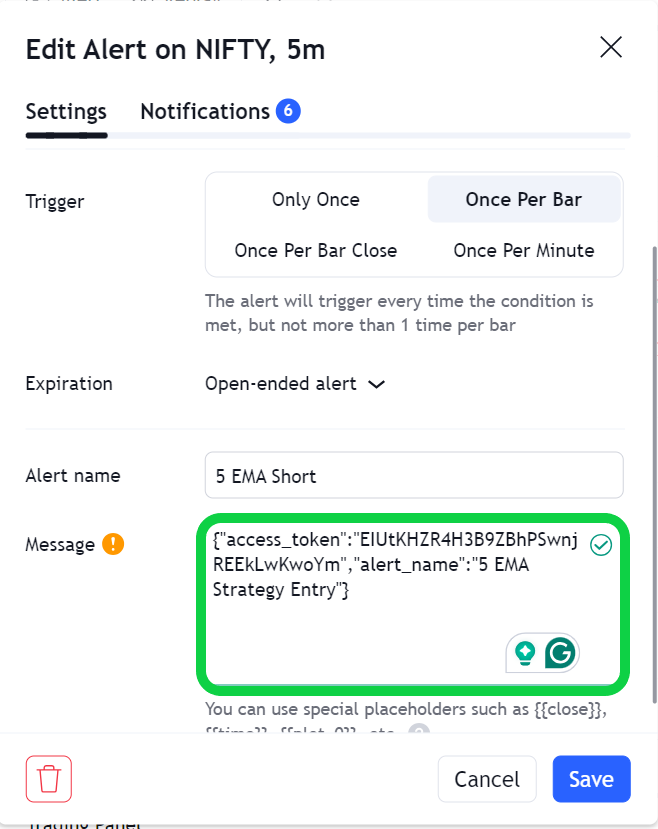
- Return to the TradingView tab and click on the settings button on our entry alert as shown in the image below.

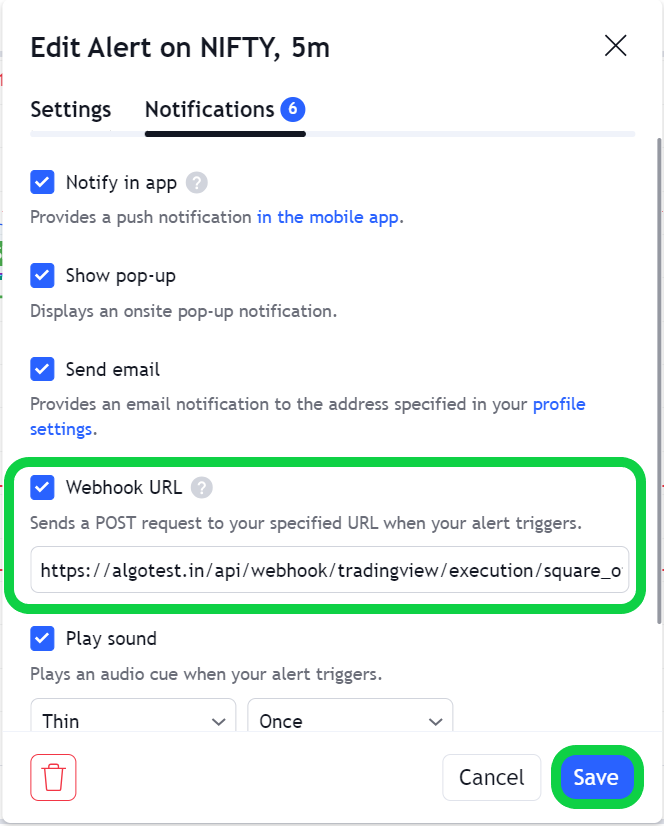
- Paste the JSON code that we copied from AlgoTest in the Message box of alert as shown in the image below.After pasting the JSON code in the message box, we need to copy the webhook URL from AlgoTest and paste it into the webhook URL field of the same alert.
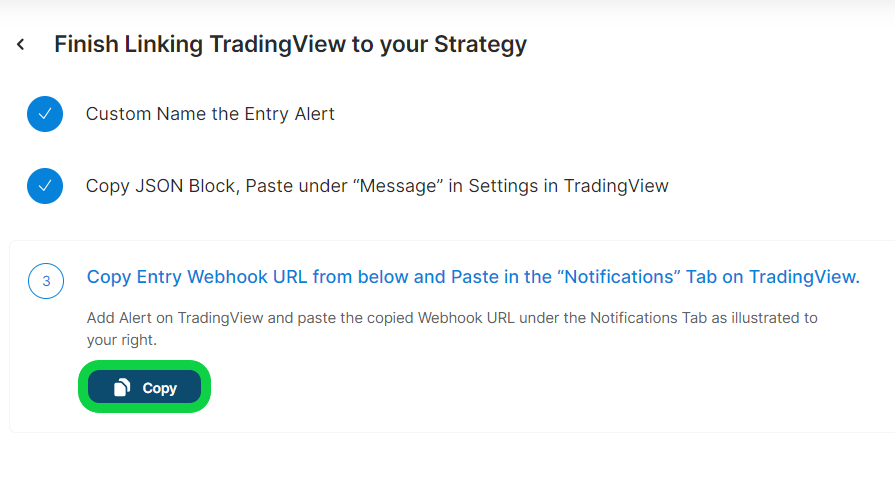
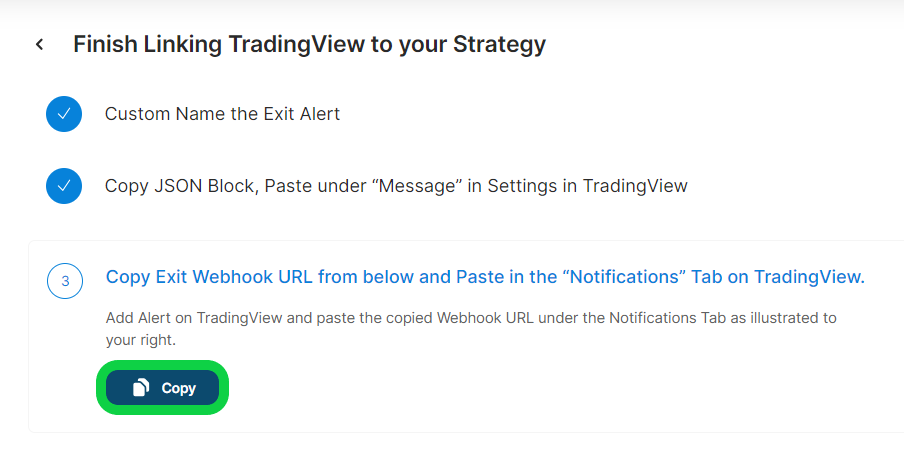
- Navigate to the AlgoTest tab and click 'I have pasted.' The webhook URL will be shown, along with a 'Copy' button. Click 'Copy,' as seen in the figure below. This webhook URL must be pasted into the 'Notification' page we accessed in the previous step.
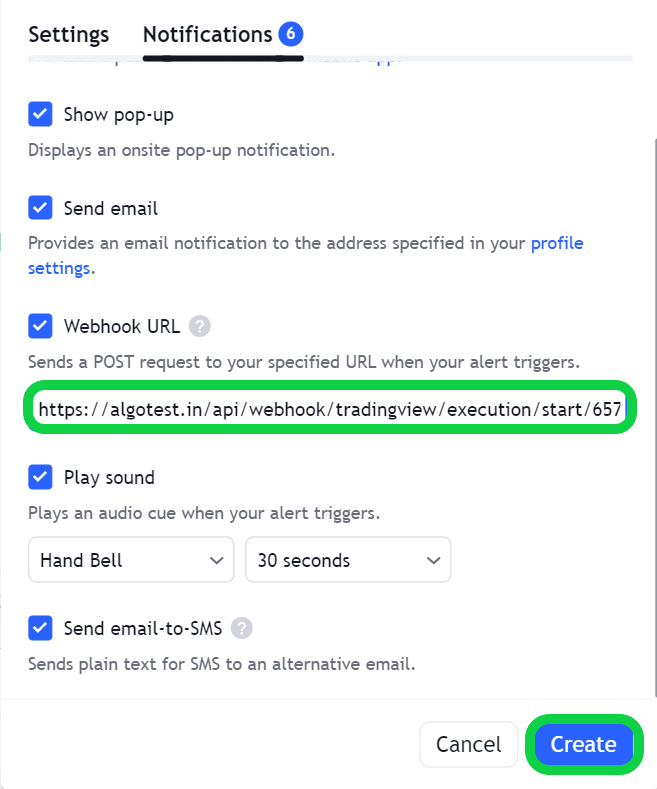
- Then, as seen in the figure below, enter the copied Webhook URL into the 'Webhook URL' space under the 'Notification' tab and click on the Create button. If the Webhook URL is already filled in, please be sure to clear it before inserting the copied URL.
- Our TradingView Entry alert has now been successfully established. The next step is to setup exit alert. Return to the AlgoTest page, and you'll see an option for adding an exit alert (optional), as seen in the image below.
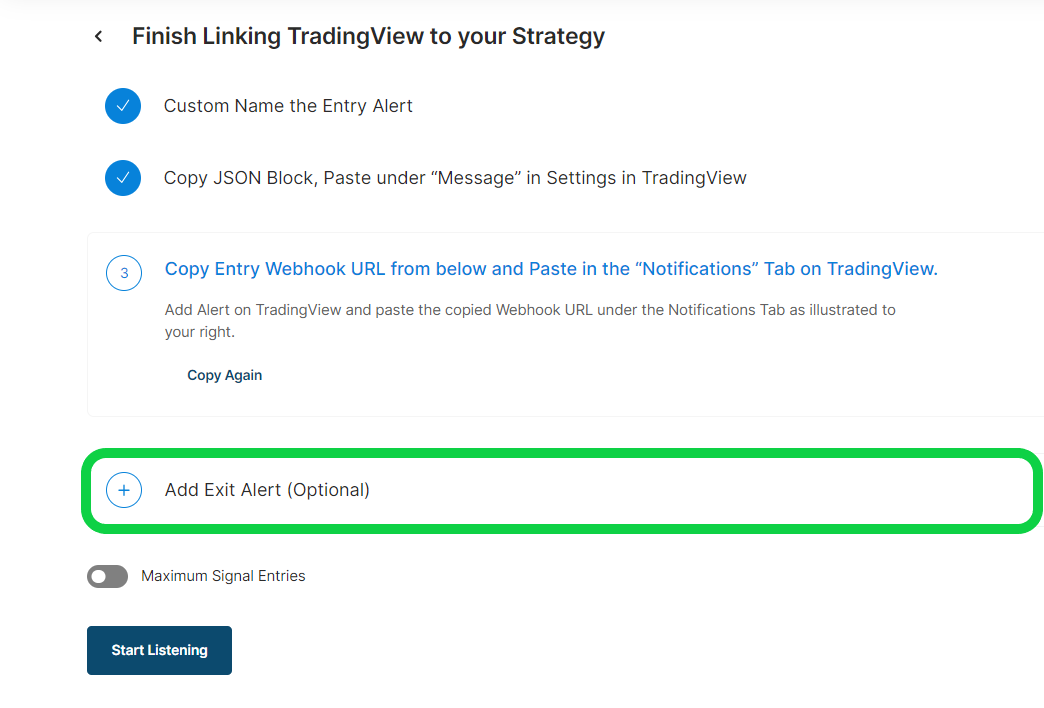
- Click 'Add Exit Alert,' as seen in the figure above.
-Give it a distinct name and save the alert configuration.
-Then you'll notice a JSON block message. Make a copy of this message.
-Go back to the TradingView tab.
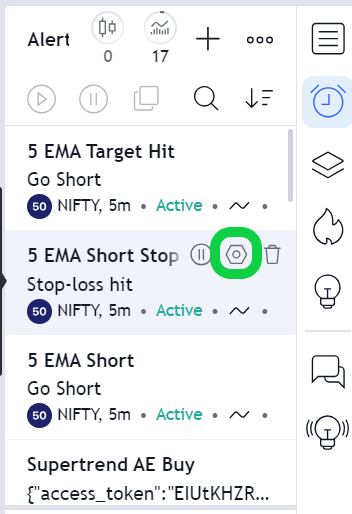
We had already created two exit alerts in TradingView. One is Stop-Loss alert and other is Target alert as shown in the image below. We need to paste this Json code in message box of both of these alerts.

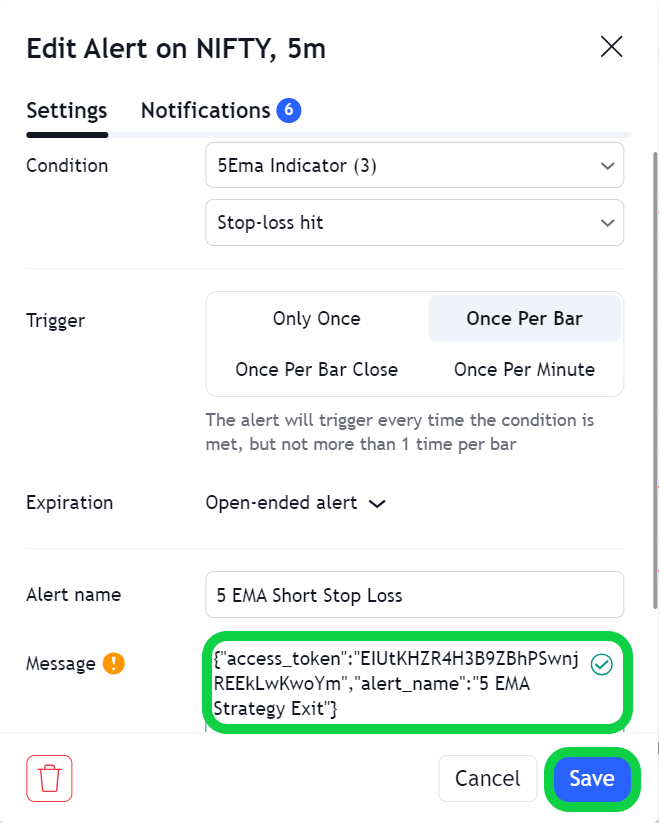
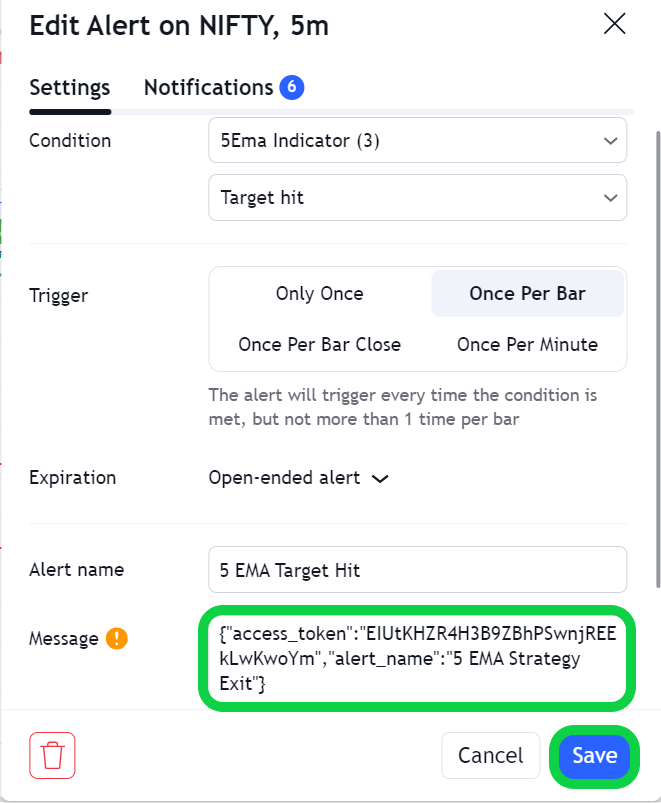
- Paste the JSON Code in the message box of both of these alerts as shown in the image below and save them.
- Now we need to copy webhook URL from AlgoTest and paste that in Stop-Loss and Target Alerts. To copy webhook URL from AlgoTest, go to AlgoTest tab and click on "I have pasted" and copy the webhook URL as shown in the image below.
- Paste it into the notification tab's 'Webhook URL' option of both the Alerts, just as we did when establishing the entry alert. Click on the save button.
- Finally, return to the AlgoTest page and click on 'Start Listening,' as seen in the figure below by the green marker.
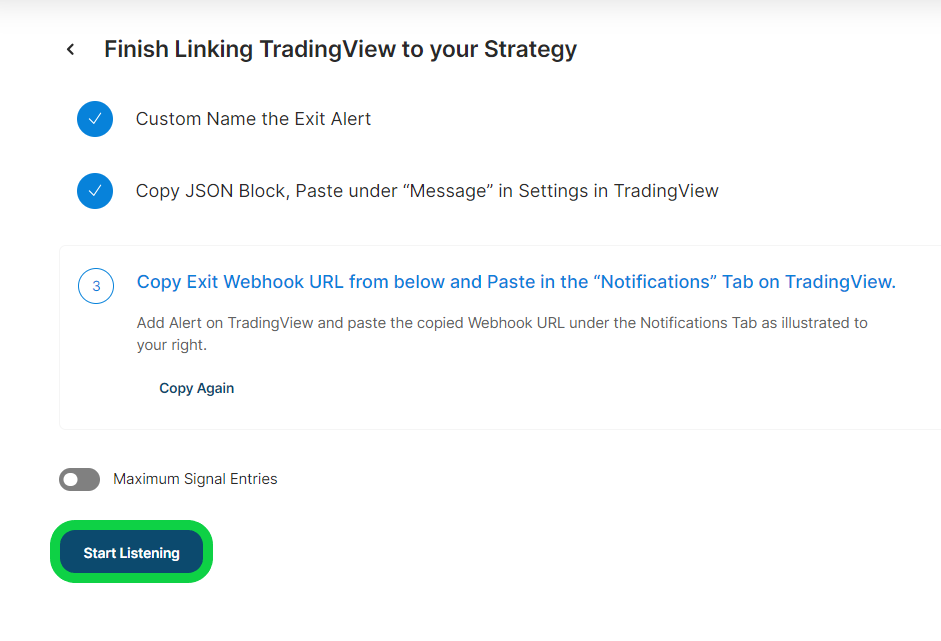
- Your strategy will show up as "listening" on the SIGNAL tab of AlgoTest if all the stages have been followed successfully, as seen in the screenshot below.
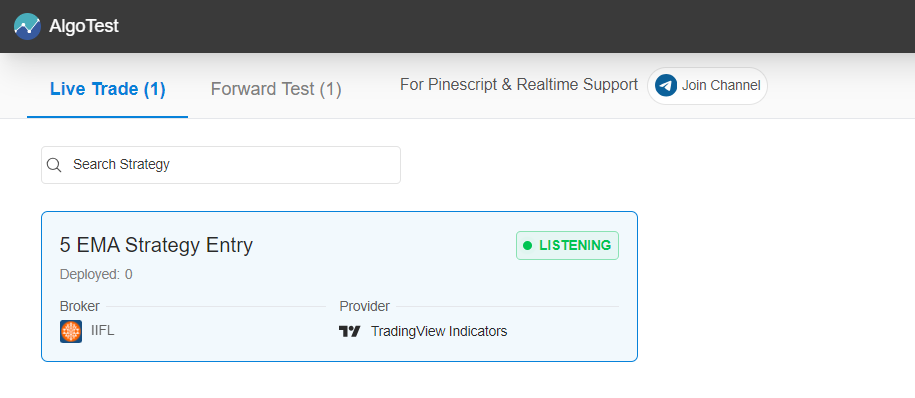
- Our strategy is now active and prepared to execute the trade in case any alerts are generated in TradingView by the 5 EMA indicator according to our strategy conditions.